|
Cómo citar 1. Para citas en el texto (Materiales y métodos): 2. Para la tabla de recursos clave: |
||
|
Llamada gratuita: (877) 796-6397 -- Solo EE. UU. y Canadá -- |
Fax: +1-832-582-8590 Pedidos: +1-832-582-8158 |
Soporte técnico: +1-832-582-8158 Ext:3 Por favor, indique su número de pedido en el correo electrónico. Nos esforzamos por responder a todas las consultas por correo electrónico en el plazo de un día hábil. |
Descripción biológica
| Especificidad | ULK1 Antibody [K18A5] detecta niveles endógenos de la proteína ULK1 total. |
|---|---|
| Antecedentes | ULK1 (Unc-51 Like Autophagy Activating Kinase 1) es una serina/treonina proteína quinasa perteneciente a la familia UNC-51/Atg1, homólogo mamífero de C. elegans unc-51 y levadura Atg1, esencial para la iniciación de la Autophagy y la guía axonal neuronal. ULK1 (1058 aminoácidos, ~140 kDa) comprende un dominio quinasa N-terminal (residuos 1-280) con una tríada catalítica conservada, un dominio central rico en prolina/serina (PS) (281-500) que media las interacciones proteicas, y un dominio C-terminal (501-1058) con motivos de unión a Atg13/FIP200 y sitios de fosforilación reguladores (Ser317/Ser555/Ser777 por AMPK; Ser757 por mTOR). ULK1 forma un complejo estable con Atg13, FIP200 y Atg101 que se localiza en las regiones tubulovesiculares del RE/vesículas Atg9 tras la privación de nutrientes; la fosforilación por AMPK activa la actividad quinasa de ULK1, induciendo la autofosforilación y la fosforilación de Atg13/Atg101/FIP200 para nuclear el ensamblaje del fagóforo, mientras que la fosforilación por mTORC1 inhibe la formación del complejo. ULK1 forma cúmulos de más de 30 moléculas para iniciar la biogénesis del autofagosoma y también tiene funciones no autofágicas, como la mediación de la endocitosis del cono de crecimiento para el tráfico de NGF (a través de SynGAP/syntenin) y la regulación de la mitofagia. La desregulación de ULK1 está implicada en la neurodegeneración a través de defectos axonales, el cáncer, donde la Autophagy suprimida ayuda a la supervivencia tumoral, y los trastornos metabólicos. |
Información de uso
| Aplicación | WB, IP | Dilución |
|
||||
|---|---|---|---|---|---|---|---|
| Reactividad | Human, Monkey | ||||||
| Fuente | Rabbit Monoclonal Antibody | MW | 150 kDa | ||||
| Tampón de almacenamiento | PBS, pH 7.2+50% Glycerol+0.05% BSA+0.01% NaN3 | Almacenamiento (Desde la fecha de recepción) |
-20°C (avoid freeze-thaw cycles), 2 years | ||||
| WB |
Experimental Protocol:
Sample preparation
1. Tissue: Lyse the tissue sample by adding an appropriate volume of ice-cold RIPA/NP-40 Lysis Buffer (containing Protease Inhibitor Cocktail),and homogenize the tissue at a low temperature. 2. Adherent cell: Aspirate the culture medium and wash the cells with ice-cold PBS twice. Lyse the cells by adding an appropriate volume of RIPA/NP-40 Lysis Buffer (containing Protease Inhibitor Cocktail) and put the sample on ice for 5 min. 3. Suspension cell: Transfer the culture medium to a pre-cooled centrifuge tube. Centrifuge and aspirate the supernatant. Wash the cells with ice-cold PBS twice. Lyse the cells by adding an appropriate volume of RIPA/NP-40 Lysis Buffer (containing Protease Inhibitor Cocktail) and put the sample on ice for 5 min. 4. Place the lysate into a pre-cooled microcentrifuge tube. Centrifuge at 4°C for 15 min. Collect the supernatant;
5. Remove a small volume of lysate to determine the protein concentration;
6. Combine the lysate with protein loading buffer. Boil 20 µL sample under 95-100°C for 5 min. Centrifuge for 5 min after cool down on ice.
Electrophoretic separation
1. According to the concentration of extracted protein, load appropriate amount of protein sample and marker onto SDS-PAGE gels for electrophoresis. Recommended separating gel (lower gel) concentration: 5%. Reference Table for Selecting SDS-PAGE Separation Gel Concentrations 2. Power up 80V for 30 minutes. Then the power supply is adjusted (110 V~150 V), the Marker is observed, and the electrophoresis can be stopped when the indicator band of the predyed protein Marker where the protein is located is properly separated. (Note that the current should not be too large when electrophoresis, too large current (more than 150 mA) will cause the temperature to rise, affecting the result of running glue. If high currents cannot be avoided, an ice bath can be used to cool the bath.)
Transfer membrane
1. Take out the converter, soak the clip and consumables in the pre-cooled converter;
2. Activate PVDF membrane with methanol for 1 min and rinse with transfer buffer;
3. Install it in the order of "black edge of clip - sponge - filter paper - filter paper - glue -PVDF membrane - filter paper - filter paper - sponge - white edge of clip"; 4. The protein was electrotransferred to PVDF membrane. ( 0.45 µm PVDF membrane is recommended ) Reference Table for Selecting PVDF Membrane Pore Size Specifications Recommended conditions for wet transfer: 200 mA, 120 min. ( Note that the transfer conditions can be adjusted according to the protein size. For high-molecular-weight proteins, a higher current and longer transfer time are recommended. However, ensure that the transfer tank remains at a low temperature to prevent gel melting.)
Block
1. After electrotransfer, wash the film with TBST at room temperature for 5 minutes;
2. Incubate the film in the blocking solution for 1 hour at room temperature;
3. Wash the film with TBST for 3 times, 5 minutes each time.
Antibody incubation
1. Use 5% skim milk powder to prepare the primary antibody working liquid (recommended dilution ratio for primary antibody 1:1000), gently shake and incubate with the film at 4°C overnight; 2. Wash the film with TBST 3 times, 5 minutes each time;
3. Add the secondary antibody to the blocking solution and incubate with the film gently at room temperature for 1 hour;
4. After incubation, wash the film with TBST 3 times for 5 minutes each time.
Antibody staining
1. Add the prepared ECL luminescent substrate (or select other color developing substrate according to the second antibody) and mix evenly;
2. Incubate with the film for 1 minute, remove excess substrate (keep the film moist), wrap with plastic film, and expose in the imaging system.
|
Referencias
|
Datos de aplicación
WB
Validado por Selleck
-
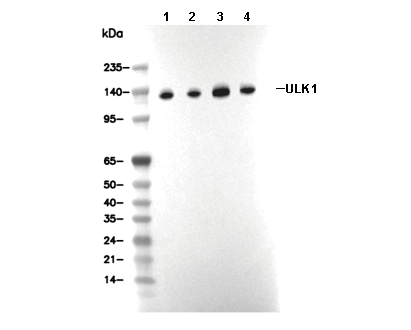 Lane 1: RD, Lane 2: RCK8, Lane 3: A172, Lane 4: Vero